July 30, 2011

Northwest Lemon Tart


One of my favorite restaurants growing up in Seattle, Washington was the Wharf restaurant close to the docks downtown. We would go there once a year to celebrate the anniversary of our arrival to Seattle when I was about 5. My favorite item on the menu was their lemon tart and I'm pretty sure I got it every time. Well, all these years later I decided to try to duplicate this dessert and I think I've come pretty close. The crust is a shortbread recipe my sister uses for quiches and the lemon tart is a lemon curd that has just the perfect amount of sweetness. I have named this Northwest Lemon Tart after those childhood memories. I hope you enjoy a small piece of my own personal history when you make these! The recipe below yields 1 tart and serves about 12. Enjoy!

HELPS
1. The longer you let the curd boil, the more firm it will be when it sets. If you want it to set almost like jello, boil it the full 2 minutes. If you prefer the curd to be more loose, boil it about 1 minute.
2. The decorative garnish shown above can be made using a simple tool or you can use a paring knife to cut strips off a lemon, cut the rind off and then curl them yourself by twisting them.

INGREDIENTS
Tart Shell
3 oz cream cheese, softened
1/2 cup butter, softened
1 cup all-purpose flour

Lemon Curd
1 1/2 cups sugar
6 Tbs cornstarch
1/4 tsp salt
1/3 cup fresh lemon juice
1/2 cup cold water
3 egg yolks, well beaten
2 Tbs butter
1 1/2 cups boiling water
1 tsp lemon extract
1 tsp lemon zest
3 drops yellow food coloring

DIRECTIONS
Tart Shell
1. Preheat oven to 350 F.
2. Blend cream cheese and butter.
2. Stir in flour just until blended.


3. Chill about 1 hour.


4. Press into ungreased tart pan to make a shallow shell, then prick with a fork.


5. Bake for 12-15 minutes, just until shell is lightly browned.


6. Let cool completely.

Lemon Curd
1. In saucepan whisk together sugar, cornstarch, and salt.


2. Blend in lemon juice and cold water.


3. Add egg yolks and blend until smooth.


4. Add butter.
5. Gradually stir in boiling water.


6. Bring to a boil over medium heat, stirring constantly.
7. Boil 2 minutes then remove from heat.


8. Add lemon extract, zest, and food coloring.
9. Partially cool for 30 minutes.
10. Pour into the baked tart shell and refrigerate at least 30 minutes.


11. Garnish as desired with lemon pieces or whipped cream.

July 26, 2011

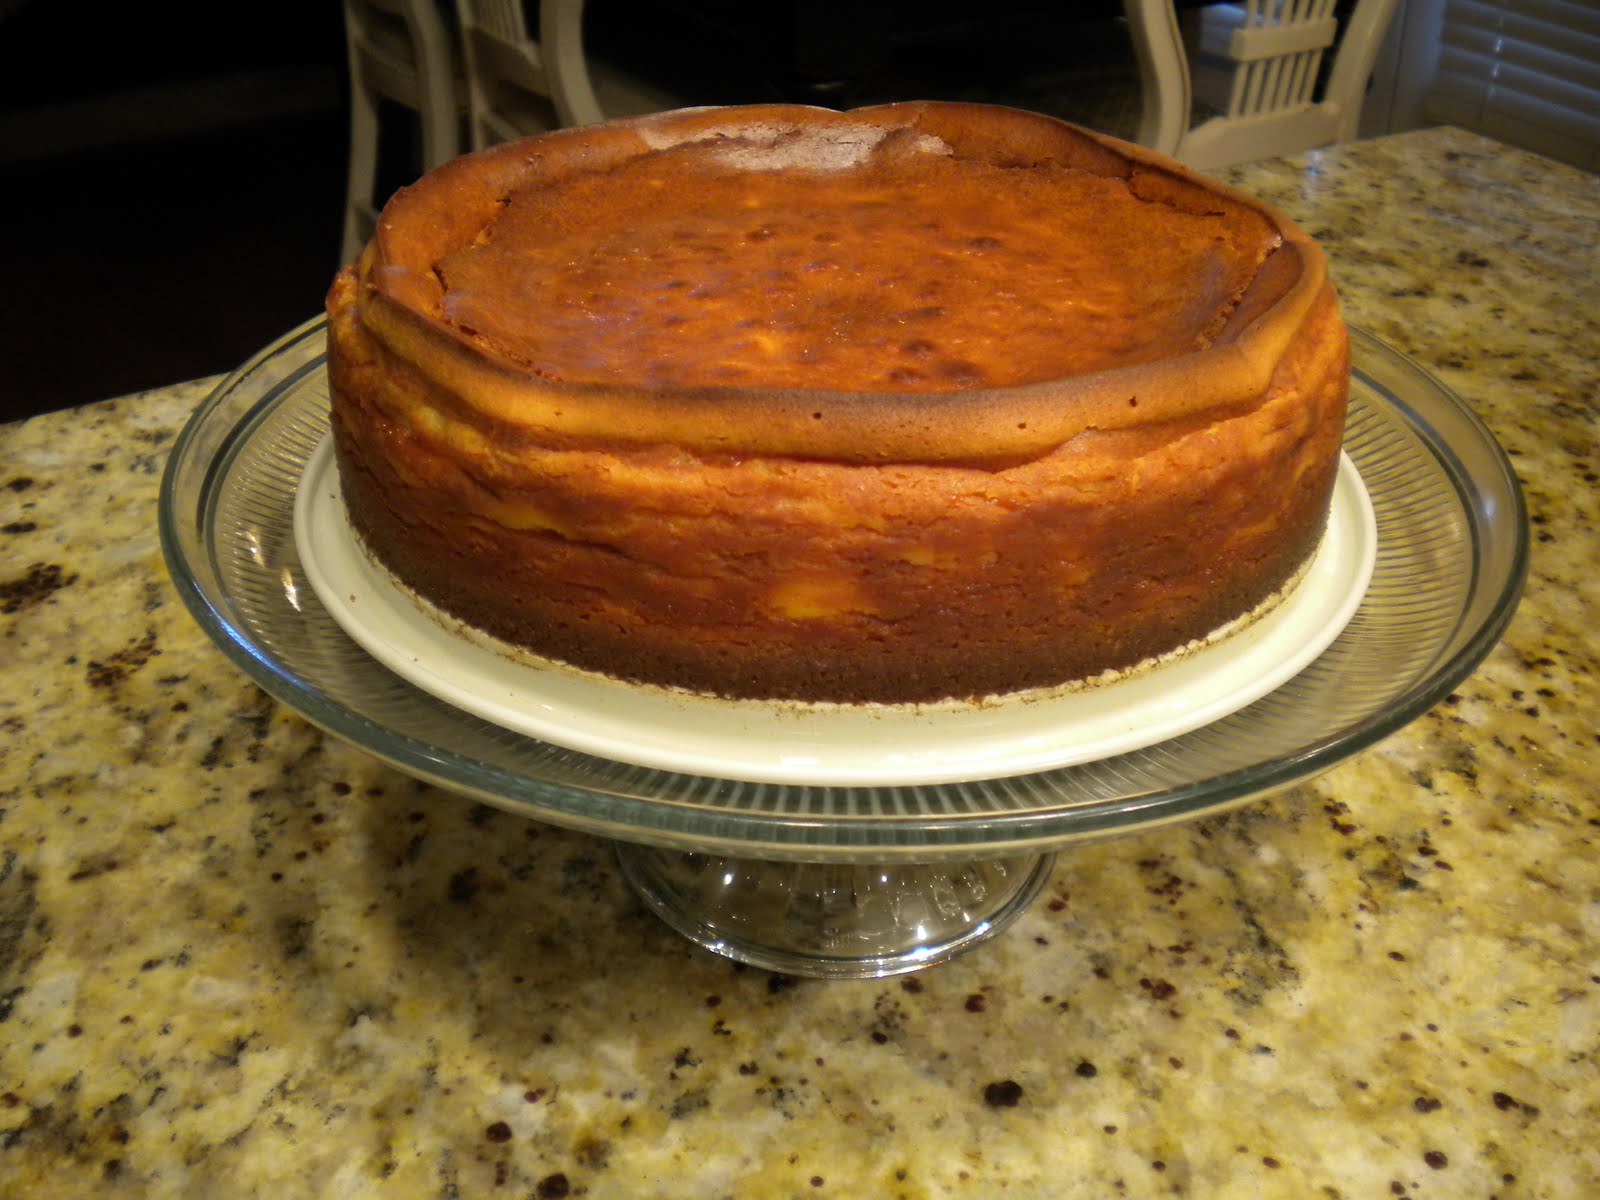
New York Deli Cheesecake


This cheesecake is as good as any found in a New York Deli. Thick, dense and relatively easy to make, it bakes without the normal cheesecake techniques of the water bath and tin foil.

HELPFUL HINTS 
1. This is not a dessert that can be made last minute. After baking for one hour, it stays in the oven for 5 hours and then needs at least 3-4 hours in the refrigerator to settle.
2. The cooking method creates a beautiful rim which is excellent for holding in a topping of various kinds of fruit such as blueberries, strawberries, mangos, etc. 

INGREDIENTS
15 full graham crackers, finely crushed
2 Tbs butter, melted
1 1/2 cups sugar
32oz cream cheese, room temperature
3/4 cup heavy cream, room temperature
4 eggs, room temperature
1 cup sour cream, room temperature
1 Tbs vanilla extract
1/4 cup flour, sifted
Rind from one lemon
2 tsp lemon juice

DIRECTIONS
1. Preheat oven to 350 degrees F.
2. Grease a 9 inch springform pan.
3. Mix graham cracker crumbs with melted butter, then press onto the bottom of the springform pan.


4. In a stand mixer using a paddle attachment, mix cream cheese with sugar until smooth.\


5. Blend in heavy cream.


6. Mix in the eggs one at a time, mixing just until incorporated.


7. Slowly mix in sour cream, vanilla and flour until smooth.


8. Mix in lemon zest and juice. 
9. Pour filling into prepared crust.


10. Place on sheet pan on middle rack in oven and bake for 1 hour. 
11. Turn the oven off and let the cheesecake cool in the oven for 5 hours without opening the oven door. 
12. Chill in the refrigerator at least 3-4 hours, but preferably overnight until serving.
   

April 23, 2011

Profiterolles au Chocolat


This wonderful dessert comes from Chefs de France, the French restaurant in Epcot at Disneyworld. It takes vanilla ice cream, encapsulates it in choux paste and tops it with a dark chocolate sauce and white chocolate nibs. I combined several recipes to get the texture and taste similar to the restaurants and it turned out to be an elegant dish that I have added to my menu for upcoming dinner parties.

HELPFUL HINTS
1. Don't let the choux paste intimidate you. Officially called Pâte à Choux, it is easy to make and can be used in several applications including cream puffs, éclairs, and gougères.
2. If you don't have a standing mixer, you can use a sturdy wooden spoon when you add the eggs. An electric beater will also work.
3. When removing the pan from the heat, don't let it cool too much. You don't want to cook the eggs too quickly but the paste should still be warm to hot.

INGREDIENTS
Profiteroles
8 oz water (1 cup)
1 Tbs sugar
4 oz butter (1 stick)
1/8 tsp salt
4 oz flour
8 oz eggs (4 large eggs)

Chocolate Sauce
3 cups heavy cream
1/4 cup sugar
1 cup dark chocolate chips
1 Tbs vanilla
2 Tbs butter

DIRECTIONS
Profiteroles
1. Preheat oven to 425F.
2. Bring water, sugar, butter and salt to simmer over high heat.


3. Reduce the heat to medium, add flour and stir rapidly.


4. As dough forms and pulls away from sides, keep stirring another minute or two.


5. Remove pan from heat and let it cool slightly, a few minutes.
6. Transfer paste to standing mixer fitted with paddle.
7. Add the eggs one at a time until each is combined into the paste.


8. Spoon out golf-ball sized portions onto parchment or silpat lined baking sheet.


9. Place in oven for 10 minutes, then reduce heat to 350 for 15 minutes longer.


Chocolate Sauce
1. Add sugar to heavy cream.


2. Scald mixture over high heat.
3. Add chocolate chips and lower heat to medium, while stirring continuously.


4. Stir in butter and vanilla.
5. Remove from heat and let cool to room temperature before serving.

ASSEMBLY
1. Pour a thin layer of chocolate sauce on the plate.


2. Place bottom half of pastry on chocolate layer.
3. Add a small scoop of ice cream, then add top half of pastry.


4. Pour additional chocolate sauce on top and sprinkle white chocolate nibs.


March 27, 2011

Buckeyes


Buckeyes are a favorite candy from Ohio, named after the horse-chestnut tree, or buckeye. These candies are made from balls of a peanut butter center dipped close to the top to resemble the buckeye nut. The trick to these is getting just the right consistency to the peanut butter center. If too little is used, the centers won't be firm enough and won't hold shape. If too much is used, the centers will be too crumbly. This was the first time I had made them and they were definitely a hit on the Christmas plate of goodies. The recipe below comes from my "Chocolates and Confections" book by Peter Greweling and makes approximately 5 dozen. Enjoy!

INGREDIENTS
1 cup Peanut Butter, smooth
8 Tbsp Unsalted Butter, soft
1 tsp Vanilla Extract
3 cups Confection Sugar, sifted
1 lb Dark Chocolate, melted, tempered

DIRECTIONS
1. Line 2 sheet pans with parchment paper.
2. Cream together the peanut butter, butter and vanilla extract in a mixer fitted with a paddle attachment on medium speed.


3. Add the confectioner’s sugar slowly until the mixture forms a workable dough. Add up to ½ cup more sugar if necessary.


4. Remove the mixture from the machine.


5. Using a teaspoon, scoop out balls of the buckeye mixture and place the portions on the sheet pans.


6. Using your hands, roll the portions into round balls 1 ¼ inches in diameter, then return to the sheet pan.
7. Chill the formed buckeyes for approximately 20 minutes.
8. Impale each buckeye lightly with a toothpick to use as a handle for dipping chocolate.
9. Holding a buckeye by the toothpick, dip it in the tempered chocolate, leaving a ½ inch circle of the center uncoated on top.


10. Place on a prepared sheet pan.


11. Remove the toothpick and smooth the small hold on top of the candy.
12. Allow the chocolate to set completely.
13. Store at room temperature, tightly sealed.

March 21, 2011

Citrus Confit


A "Confit" is derived from an ancient method of preserving meat by salting and cooking and then storing it in its own fat which acts as a preservative. That method is followed using fruit and sugar in this recipe which comes from my "Chocolates and Confections" book by Peter Greweling. I grew up loving these treats and used to get them from time to time from Boehms Candy shop in Issaquah, WA. I tried making them once before but the recipe didn't work so thankfully this one did and they came out just as I had remembered them; slightly chewy, strong citrus flavor, sweet and nicely balanced with the chocolate covering. I took the recipe below and julienned the quarters which yielded over 100 pieces, and then dipped them in tempered chocolate. My one mistake was mixing lemon and orange quarters together in the syrup mixture. The lemons took on the orange color so in the future I'll do either oranges or lemons in a batch. Enjoy!

INGREDIENTS
5 Oranges, Lemons or Grapefruits
3 Cups Sugar
2 Cups light Corn Syrup
2 Cups Water

DIRECTIONS
1. Quarter the fruits and peel the skins off the interior. Reserve the interiors for another use.


2. Put the skins in a 4 quart saucepan and cover them with cold water.
3. Bring to a boil, remove from the heat, and drain. Repeat this step two more times, using fresh water each time.


4. Combine the sugar, corn syrup and water in the now empty 4 quart saucepan and bring to a simmer.
5. Add the blanched citrus peels, cover and return to a simmer.


6. Simmer the skins gently for 90 minutes, stirring occasionally.
7. Remove from the heat and allow to cool to room temperature in the syrup.
8. Store refrigerated in the syrup in a sealed container for up to 4 weeks.